You Can Learn to Sew Model DL02 Also in Our Online Course
Sewing Instructions

THE BAND
The fabrics can be used very efficiently, because you don’t have to worry about the grainlines or stretch directions at all.
However, it is good to cut mirror images of the foam pieces symmetrically.
The Band
Side Boning

Make a casing for the boning by folding a 6 cm (2 3/8″) wide strip of non-stretch fabric in half, then fold in half again. The final width will be about 1,5 cm (9/16″). Stitch the tunnel in place using a narrow zigzag or straight stitch.
The casing can also be made after the bra is fully completed. In this case leave the boning casing longer so the bones will span over the upper and lower elastics.
Combining The Bra Band Parts

Place the cover and lining of the bridge pieces right sides together. Sandwich the band pieces between the bridge layers so the right side of the band faces the right side of the bridge cover and the wrong side of the band is against the lining. Stitch all layers together.

The Upper Edge of The Bridge
Stitch the upper edge of the bridge cover and lining pieces together. Turn over the seam allowance and topstitch in place.

Or simply…
Cut the stabilizer (a light, non-stretch piece of fabric) as in the picture using the band pattern. Set the stabilizer and bridge right sides against each other. Stitch together at the top and turn the stabilizer over to the wrong side of the band. Topstitch. Pin the lower edge of the stabilizer in place until it will be fastened over next steps.
The Upper Elastics of The Band

Place the right (non-plush) side of the elastic against the right side of the band. If your elastic has a picot edge make sure the picots face toward the band. zigzag the elastic in place along the inside edge. Depending on the width of the elastic used the zigzag should be 3.5-5 mm wide and 1.5-2.5 mm long. Turn the elastic to the inside of the bra band along the zigzag and stitch in place. Bartack the upper edge of the boning tunnel. This prevents the plastic boning from breaking the seam.
The Lower Elastic of The Band

Cut the boning. Smooth and round off the ends with a file. The bone should be 1.0cm (3/8″) shorter than the casing because the casing shrinks when the bra is worn. This will make the bra more comfortable during wear and prevent the edges from tearing through the casing. Insert the boning into the casing.
Zigzag the bottom elastic to the right side of the band. Like the upper edge elastics the bottom elastic will be turned over and stitched in place, but don’t stitch the second zigzag yet!
If you made the bridge out of a non-stretch fabric, make small clips to the curvy seam allowances so they will lay flat when turned.
The Cup
Prepare The Cup Foam Lining
Align the edges of the middle panel and strap attachment (pieces 2 and 3) with the side panel (piece 4) so the foam edges touch but do not overlap each other. Sew the pieces together using a zigzag stitching, making sure the zigzag stitch is wide enough to catch both pieces and the edges of the foam pieces are centered within the zigzag stitch. Feed the pieces evenly and use alignment marks (arrows) as an aid. Backstitch at the beginning and end of the stitching.
Attach the foam lining piece 1 to the rest of the foam cup by zigzagging in place. Once again you want to make sure your zigzag stitch centered over the cut edges of the foam and is wide enough to catch both pieces.
Make The Cup Cover

Stitch the cup cover pieces together. Press open the seam allowances and topstitch using a narrow zigzag stitch. Make sure that the seam allowance stays open when sewing! Trimming the seam allowances after topstitching will help reduce bulk but is not necessary for all fabrics (such as a thin lace).
Combine The Cup Lining and Cover

Place the finished cup cover over the foam lining. Pin at the center of the cup. Stretch the cover gently in the direction of the seamlines, making sure not to collapse the foam of the cup, and pin in place at the outer edge of the foam. When the seams are nicely in place, you can continue stretching the cover over the foam lining evenly in every direction. Pin along the entire outer edge of the foam lining. Any cover fabric extending over the foam edge will be cut away later. Stretch the fabric gently over the foam strap as well. Since the straps are so narrow there will be minimal, if any, extra fabric to trim away at the foam edge.
Repeat this process for the other cup. Compare both cups, making sure the cover is evenly matched. The stretch and the bias grain of fabric can affect how evenly the fabric stretches over different parts of the cup.
Zigzag around The Cup

Working from the foam lining side of the cup, zigzag the outer edge of the foam lining to minimize bulk. The stitch should be long and not too wide (4.5mm width, 3.0mm length). Zigzagging flattens the foam edges and makes the cup easier to handle in the next steps. Carefully trim away the extra cup cover fabric around the edges.
Fold Over Elastic at Edges of The Cup

Finish the cup edges by stitching fold over elastic along the neckline and armhole edges.
If you find it difficult to attach the fold over elastic in one pass of stitching try using the following method:
Place the FOE (fold over elastic) under the cup edge so that the center line of the elastic is barely visible. Stitch the foldover elastic to the wrong side of the cup using a straight stitch, being careful to neither stretch nor ease the elastic under the presser foot. Turn the cup over and fold the FOE over the edge onto the right side of the cup. zigzag the elastic in place.

Attach the ring to end of the fabric straps by looping the end of the strap around the ring and sewing the strap in place using a small, narrow zigzag stitch.
Attach The Cups to Band

Attach the cups to the band using a straight stitch.
Attaching Underwire Casing


Place the underwire casing as in image and sew it so that stitch becomes over the seam joining cup and the band.
A. Place the underwire casing against the foam cup as shown in the image. The casing should be on top of the foam cup and band seam allowances. The inner edge of the casing should face toward the foam cup.
B. Line up the stitching on the casing with the stitching used to attach the cups to the band and sew in place, using the stitching on the casing as your guide.
C. Fold and pin the bottom band elastic in place. Fold the casing over the seam allowances, toward the bottom of the band and elastic, and edgestitch in place along the outer edge of the casing.
D. Turn the elastic over and zigzag in place. Depending on the width of the elastic used the zigzag should be 3.5-5 mm wide and 1.5-2.5 mm long.
The Back
Fit The Bra Band

Try the bra on and fit the band, pinning out any extra length at the center back When taking off the bra leave the pins in place at the center back. Trim the center back at both sides at least 2 cm (3/4″). This will give a proper fit after attaching the closure. Bras stretch out over time so fastening a new bra on the middle or last row of hooks instead of the first hook will help extend the life of the bra.
Finish The Back

Thread one end of the strap elastic through a slide adjuster. Wrap the elastic around the bar of the slide adjuster and secure in place by stitching as close as possible to the bar using a narrow zigzag or straight stitch.
Thread the other end of the strap elastic through the ring attached to fabric strap and then back through the slide adjuster. Secure the elastic to the bra by stitching across the elastic at the top and bottom of the band using a narrow, dense zigzag stitch.

Insert the underwires. Close and reinforce the wire casing ends by zigzagging across the ends using a narrow, dense zigzag stitch.
Attach the back closure

Enclose the left side of the center back wing within the eye closure, and zigzag in place. To prevent fraying finish the edges of the closure using a zigzag stitch.
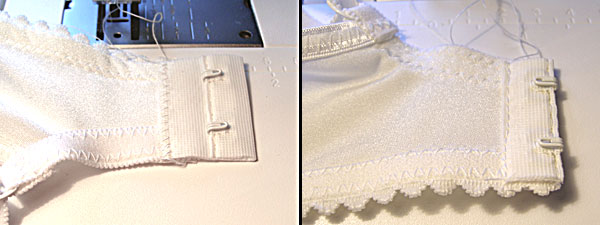
Open the hook closure. Position it so the foldline of the hook closure is even with the center back edge of the right wing. Sew in place using a zigzag stitch. Turn the bra around, fold the tape to the wrong side of the bra and sew in place with straight stitch. It helps to have the needle positioned as far right as possible. Using a zipper foot helps as well.