
THE CUP
The fabrics can be used very efficiently, because you don’t have to worry about the grainlines or stretch directions at all.
However, it is good to cut mirror images of the foam pieces symmetrically. Otherwise you can lay patterns in any direction.
The Cup
Prepare the foam cup lining

Using a washable fabric marker, mark the underwire channeling placement line on the wrong side of the foam lining pieces by lining up the cup guide piece against the lower edge of the foam and tracing along the upper edge.
Hold the edges of the foam together so they are touching but do not overlap. Stitch the diagonal seam of the cup pieces together using a zigzag or three-step zigzag stitch. The stitch should be wide enough so that both edges of the cup are caught by the stitching.
Make The Cup Cover

Stitch the cup cover pieces together using a 3mm straight stitch. Press the seam allowances open with your fingers and topstitch using a 3mm wide zigzag stitch, making sure the zigzag is centered over the seamline. Trim seam allowance close to stitching.
Combine The Cup Lining and Cover

Pull the cup cover pieces over the foam lining and pin in place along the edges. If you are using a stretchy fabric make sure to pull the fabric just enough so that it is smooth, but not so much that it collapses or pulls the foam lining.
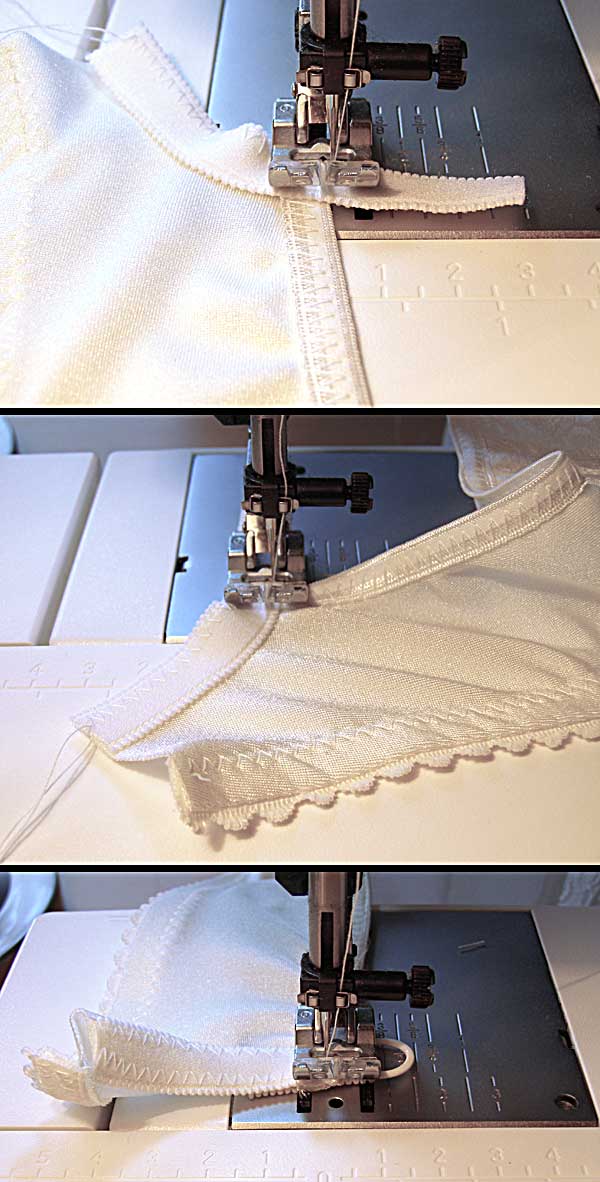
Carefully pin the cup along the upper and lower edge of the underwire channeling placement line from the wrong side.
Zigzag the upper edge of the cup as shown in the picture. If necessary trim the excess cover fabric along the edge.
Attach The Underwire Casing

Sew the underwire channeling to the foam lining, positioning the channeling so that the upper edge of the channeling aligns with the placement line you previously marked.
Join The Cups

With the right side together stitch the cups together at the center front using a straight stitch, ending 1cm (3/8″) before the bottom edge of the fabric and backstitching at the start and end of the seam. Make sure to stitch very closely to the edge of the foam lining without actually catching it in the stitching. Trim seam allowances close to the stitching.

Gently press and pin open the seam allowance. Topstitch in place using a zigzag stitch, making sure your zigzag stitch is wide enough to catch the foam lining at the center front. As you topstitch try to push the foam lining edges toward the center front. Note how the topstitching ends 1cm (3/8″) before the bottom edge of the fabric.
The Band
Attach The Cups to The Band

Flatten the side and bottom edges of the foam lining by zigzagging along the edge. Trim the cup cover seam allowances to 1cm (3/8″).
Sew the wings to the bra front using a straight stitch. Turn the seam allowance toward the front onto the foam lining and edgestitch in place using a wide zigzag.
Arrange the bra so that the wrong side of the wing is facing upward. Place the boning casing on top of the wing. The edge of the casing should align with the stitching done in the previous step, and the bottom of the casing should end 1cm (3/8″) away from the bottom edge of the fabric. Turn the casing toward the front onto the foam lining and edgestitch in place.
Attach The Lower Elastic to The Band

Place the elastic on top of the right side of the bra so the plush edge is facing up and the picots point inward toward the bra cups. Stitch the bottom band elastic in place using a 3.5mm width and 2.0 length zigzag stitch, pulling very slightly under the curve of the cups.
Turn the elastic to the wrong side of the bra and zigzag in place.
Attach The Upper Edge Elastic to The Bra

Insert the underwires into the channeling. (There will be a bit of extra room to allow for movement.) You may also insert plastic boning into the boning casings for extra support, but this is usually not necessary. If you choose to use plastic boning it should be cut about 1.0cm (1/2″) shorter than the length of the casing. After cutting the boning file the edges so the corners are smooth.
Finish the upper edge of the bra with the fold over elastic using a 5.5mm width and 2.5mm length zigzag stitch. Stretch the elastic slightly when attaching it to the wing section.
The Back
Bra Back and Straps
Set the zigzag stitch on your sewing machine to a 3mm width and 1.75mm length. Any remaining zigzag stitches can be done using this setting.
Cut two pieces of strap elastic. Each piece of elastic should be about 10cm (4″) long. Line up the elastic so the cut edge is even with the center back and side of the elastic is even with the back curve of the wing fabric. Using a narrow zigzag, stitch in place along the outer edge of the elastic, then stitch again at the inner edge. You should have about 3cm (1.25″) of extra elastic at the upper edge of the wing.
Thread the extra elastic through a ring and fold the elastic over the ring. Stitch in place using a straight stitch or very narrow zigzag stitch. Trim the excess elastic along the stitching.

Cut two more pieces of strap elastic, each about 50cm (20″) long. Loop the elastic around the bar of the slide adjuster and sew in place as close as possible to the bar. Positioning the needle to the right will help with this step. Thread the free end of the elastic through the ring attached to back and then through the slide adjuster.
Attach the other end of the strap to the cup with a straight or zigzag stitch.
Attach the back closure

Enclose the left side of the center back wing within the eye closure, and zigzag in place. To prevent fraying finish the edges of the closure using a zigzag stitch.
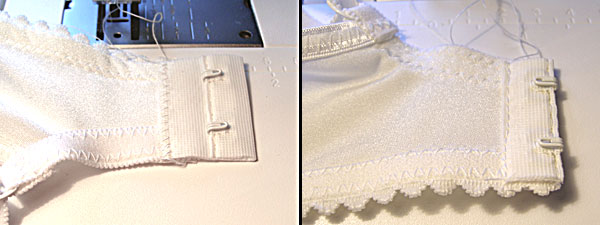
Open the hook closure. Position it so the foldline of the hook closure is even with the center back edge of the right wing. Sew in place using a zigzag stitch. Turn the bra around, fold the tape to the wrong side of the bra and sew in place with straight stitch. It helps to have the needle positioned as far right as possible. Using a zipper foot helps as well.
Reinforce the ends of the casing
To prevent the underwires and optional boning from popping out, reinforce the upper edge of the underwire and boning casing with a bartack (very narrow zigzag stitch).